The UV DTF transfer workflow offers a powerful way to create vibrant, durable graphics on garments. A strong start comes from artwork preparation for DTF and a clear map of the DTF transfer steps that follow. From selecting accurate UV printing quality settings to a reliable DTF printing workflow, every stage impacts color, sharpness, and adhesion. The process also covers DTF garment finishing and curing considerations to ensure durable results across a range of fabrics. By aligning artwork, materials, and press parameters, you can reduce misprints and streamline production across batches.
This approach to garment decoration can be framed as a UV-curable transfer on film, a digital-to-fabric workflow that emphasizes color accuracy and lasting adhesion. In practical terms, you can think of it as ‘print-on-film with UV inks’ that is subsequently pressed into fabric, or as an adhesive-based textile transfer process with a curing stage. LSI-friendly terminology connects the same core steps—artwork setup, film printing, powder application, and heat pressing—with phrases like ‘UV-curable ink process for textiles’ and ‘garment decoration workflow’ to improve contextual relevance. Whether you call it a UV-based DTF technique or a film-to-garment print sequence, the essential phases remain preparation, transfer, cure, and quality control that drive consistent results.
Understanding the UV DTF transfer workflow: from artwork to a wearable print
The UV DTF transfer workflow represents a streamlined approach to applying vibrant, durable graphics to garments. It blends artwork preparation, UV-curable inks, transfer films, adhesive powders, curing, and finishing into a repeatable process that scales from one-off designs to small batches. By coordinating each step, you minimize color drift and edge artifacts while maintaining efficient turnaround times.
From the outset, the goal is to translate digital art into a physical garment with precise colors, sharp edges, and minimal ghosting or cracking. This requires careful alignment of artwork with the eventual garment and a tuned balance between print settings and finishing parameters. Focusing on the DTF transfer steps from design to finished garment helps ensure consistent results and improves UV printing quality.
Artwork preparation for DTF: setting up files for success
Artwork preparation for DTF sets the foundation for reliable transfer results. Start with color management—calibrate your monitor, use consistent color profiles, and export print-ready files at 300 dpi for the target print size. A clean file reduces reprints and supports crisp edges when adhesive film is applied.
Because this stage directly ties to final color accuracy, consider layer organization, white underbase planning, and file integrity. Flatten layers only where necessary, and embed fonts or convert to outlines to avoid missing characters; these steps help preserve predictability during pre-press and support the DTF transfer steps that follow.
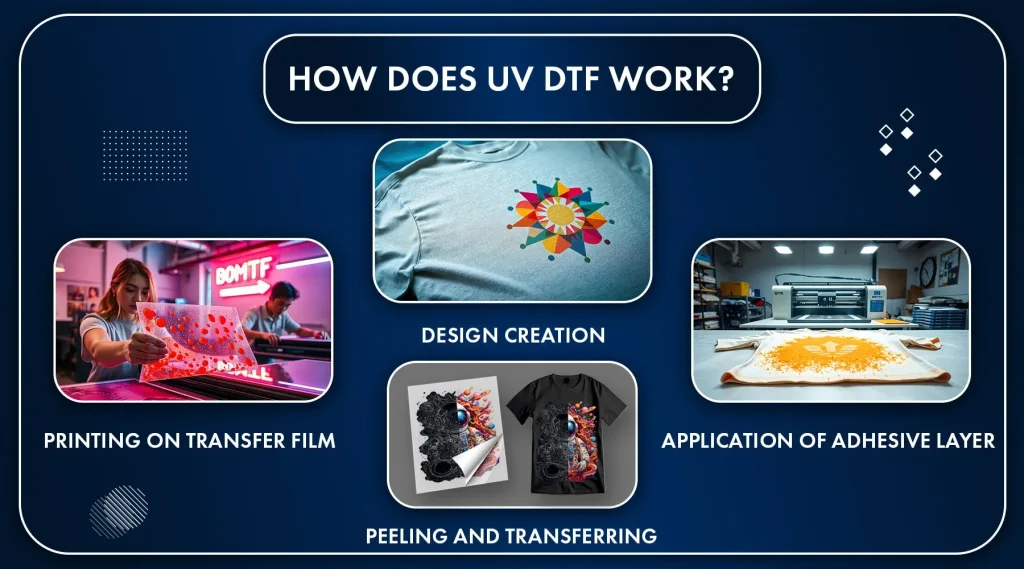
DTF transfer steps: printing, powder, and curing
DTF transfer steps: printing, powder, and curing. Printing on transfer film uses UV-curable inks and a dedicated DTF printer or a compatible setup. Run a test print to verify color accuracy, saturation, and edge fidelity before committing to production.
Powder application and curing create the adhesive-ready surface. Immediately apply a light, even layer of adhesive powder to the printed film, then cure the powder to fix it. After film finishing and trimming, proceed to heat pressing onto the garment according to fabric type and ink set, following the DTF printing workflow to maintain consistency.
Achieving optimal UV printing quality during the transfer process
UV curing is more than a quick bake—it stabilizes ink color, enhances hardness, and locks the adhesive layer onto the film. Calibrate temperature and exposure to avoid scorching fabric or over-curing, which can gloss the surface and reduce edge sharpness.
Selecting a press with even heat distribution, appropriate platen pressure, and consistent dwell time helps deliver uniform color density across the design. Consider fabric type and ink system when tuning curing parameters to preserve UV printing quality in every batch.
DTF garment finishing: finishing touches after transfer
Finishing steps include cooling, inspection, and edge reinforcement if needed. Proper finishing protects the adhesion and helps the design endure washing cycles. Document care instructions to guide end users.
Plan for post-press quality control, remove any loose particles, and verify alignment before packaging. Effective DTF garment finishing contributes to a consistent feel and long-lasting colors across garments.
Troubleshooting and optimization for consistent results in the UV DTF transfer workflow
When misprints or misalignments occur, start with the source: artwork preparation for DTF, then examine printing parameters and curing conditions. Use pilot runs and color measurement tools to identify root causes, measure color accuracy, and adjust as needed.
Maintain a robust optimization loop: run small tests, record process parameters, and compare against target swatches. A shared standard operating procedure for the UV DTF transfer workflow helps reproduce favorable results and reduces rework across batches, tying back to the broader DTF printing workflow.
Frequently Asked Questions
What are the essential DTF transfer steps within the UV DTF transfer workflow?
The essential DTF transfer steps in the UV DTF transfer workflow are printing on transfer film with UV-curable inks, applying adhesive powder, curing the powder to form a tacky film, finishing or trimming the film, and heat pressing onto the garment. Following each step with calibrated settings helps ensure color accuracy, edge sharpness, and strong adhesion across batches. Always start with a small test print to verify parameters before full production.
How does artwork preparation for DTF influence color accuracy and edge quality in the UV DTF transfer workflow?
Artwork preparation for DTF establishes the foundation for reliable results in the UV DTF transfer workflow. Use color management (calibrated monitor and printer-specific profiles), safe margins, layered organization, and font outlines to minimize color shifts, misregistration, and edge softness, improving UV printing quality and edge fidelity.
What practices in the UV DTF transfer workflow help maintain UV printing quality across batches?
In the UV DTF transfer workflow, standardize printer settings and color profiles, execute small test prints, and verify color accuracy with a test strip or colorimeter when available. Maintain consistent powder application, curing, and heat pressing parameters to keep color density, saturation, and edge sharpness stable across batches, aligning with the DTF printing workflow.
What considerations come with DTF garment finishing in the UV DTF transfer workflow to maximize durability?
DTF garment finishing involves cooling, inspection, trimming, and post-press care planning. Use an even heat distribution press, compatible fabrics, and edge reinforcement where needed to improve adhesion and wash durability, ensuring vibrant color retention throughout the UV DTF transfer workflow.
What are common issues in the DTF printing workflow when using UV-curable inks, and how does the UV DTF transfer workflow address them?
Common issues include color misalignment, ghosting around fine lines, and edge peeling after washing. Address these by tightening color management, verifying printer ICC profiles, running test strips, and tuning heat, time, and pressure. The UV DTF transfer workflow emphasizes iterative testing and process control to minimize these misprints within the DTF printing workflow.
How can you optimize the UV DTF transfer workflow with QA steps and pilot tests to reduce misprints?
Implement a robust optimization loop: run small pilot tests, measure results with a colorimeter or spectrophotometer when available, compare against target swatches, and document all parameters. Maintain batch records for garment type, ink batch, powder adhesive type, press temperature, and dwell time to reproduce favorable results across the DTF transfer steps and the overall UV DTF transfer workflow.
| Section | Key Points |
|---|---|
| Understanding the UV DTF transfer workflow |
|
| Artwork preparation for DTF |
|
| DTF transfer steps: printing, powder, and curing |
|
| UV curing, finishing, and compatibility considerations |
|
| Troubleshooting and optimization in the UV DTF transfer workflow |
|
| Long-term considerations for the UV DTF transfer workflow |
|
| Putting it all together: achieving a reliable UV DTF transfer workflow |
|
Summary
UV DTF transfer workflow is a dynamic blend of design discipline, print technology, and finishing techniques that shapes the final look and durability of garments. The approach covers artwork preparation, DTF transfer steps, UV curing and finishing, and proactive quality checks to reduce misprints and ensure consistent color across batches. By following the structured workflow outlined here, producers can improve color accuracy, minimize errors, and scale production while maintaining durable adhesion on a range of fabrics. This descriptive overview highlights how careful preparation, precise processing, and ongoing optimization come together to deliver vibrant, long-lasting UV-curable prints on textiles.