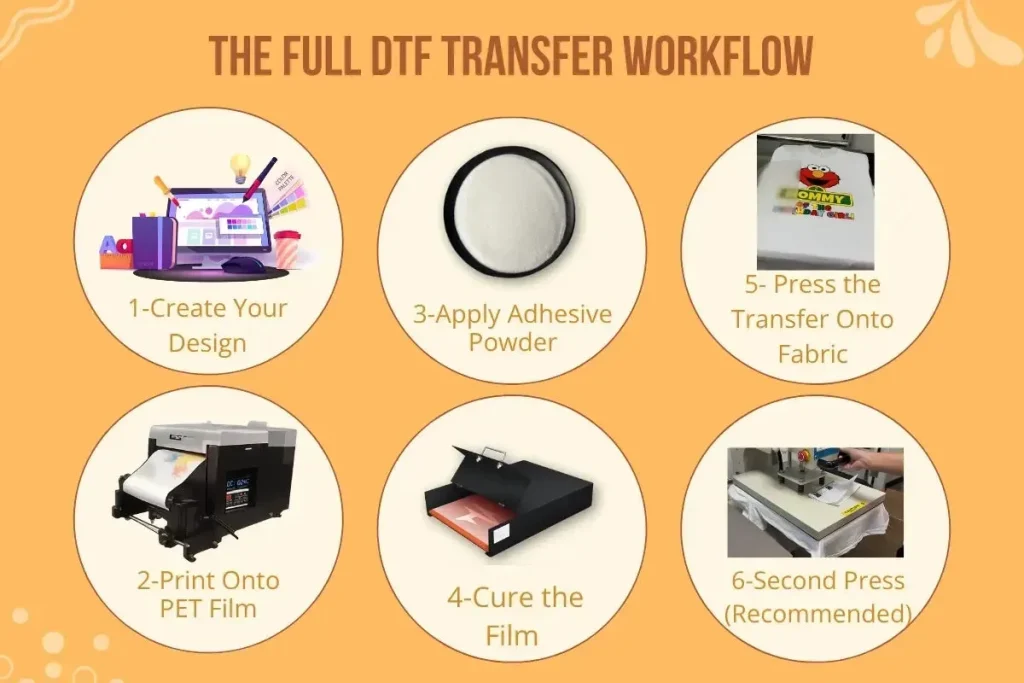
DTF printing workflow is a practical, repeatable approach that guides designers and operators from concept to transfer. Mastery starts with solid DTF prep steps, ensuring artwork, film, and powders align before any ink hits the film. A well-managed DTF curing process follows, balancing heat and time to lock in color while keeping transfer films ready for powder adhesion. Within the DTF printing workflow, optimizing DTF heat press settings and applying proven DTF printing techniques helps ensure strong adhesion and crisp details on fabric. This introductory overview also touches on DTF troubleshooting tips to prevent waste and reprints, making the workflow scalable for shops or hobbyists.
The DTF transfer workflow can also be described as a digital transfer film method that carries artwork from a computer screen to fabric via an ink-on-film interface. This framing highlights the sequence from design validation and print readiness to final adhesion, emphasizing film handling, curing, and a controlled heat press to secure the image. In line with LSI principles, terms such as ink-on-film process, transfer film quality, substrate compatibility, and color management surface as related concepts to improve discoverability and comprehension. Whether you call it digital transfer, film-based printing, or textile ink transfer, the aim remains consistent: reliable results, scalable production, and durable finishes.
DTF Prep Steps: Laying a Solid Foundation for Consistent Prints
DTF prep steps establish a repeatable baseline for every transfer. By verifying artwork color space, managing color profiles, and ensuring the transfer film is clean and ready, you minimize surprises down the line. This phase also includes checking nozzle health, film integrity, and adhesive powder readiness to promote smooth subsequent steps.
A thorough prep routine reduces misregistration and color drift, supporting reliable curing and pressing. Incorporating test prints, proofing on a scrap piece, and planning a short drying interval after printing helps ensure consistent ink density, powder adhesion, and overall transfer quality. Following established DTF printing techniques during prep sets the stage for scalable production and waste reduction.
Print Phase Excellence: Translating Design to Film with Accurate Color
The printing phase translates the prepared design into ink on PET transfer film using calibrated printer profiles and media settings. Selecting the right color management strategy, maintaining ICC profiles, and ensuring accurate color density are key to predictable results in the final transfer.
Real-time checks immediately after printing catch streaks, banding, or uneven deposition. Aligning multi-color designs with registered marks and controlling dwell time helps preserve detail and reduces rework during curing and pressing, reinforcing the role of solid DTF printing techniques in producing clean transfers.
DTF Curing Process: Activating Ink for Reliable Powder Adhesion
The curing process activates the ink and prepares the film for powder adhesion. Controlling temperature, dwell time, and ambient humidity ensures the ink dries without color shifts and creates a stable surface for subsequent powder application.
After curing, allowing the film to cool briefly helps prevent powder adhesion issues and allows handling without uneven adhesion. Checking powder adhesion on a small section verifies that the curing window and surface cleanliness are correct, reinforcing the importance of a standardized DTF curing process.
DTF Heat Press Settings: Achieving Durable, Wash-Fast Transfers
Heat press settings define the final appearance and durability of the transfer. Establishing temperature ranges, dwell times, and even pressure across the platen helps ensure crisp edges, color fidelity, and strong wash-fastness for various fabrics.
Pre-press and post-press care further refine the result. A brief pre-press removes moisture and wrinkles, while controlled cooling after pressing minimizes shifting and adhesive set issues. Documented DTF heat press settings for cotton, poly blends, and dark/light garments support consistent outcomes across jobs.
Troubleshooting and Quality Control in DTF: Practical DTF Tips and Checks
Even a well-defined workflow can encounter issues. Using clear DTF troubleshooting tips helps teams diagnose misregistration, powder adhesion problems, color shifts, or edge ghosting quickly and methodically.
A structured quality-control approach—root-cause analysis, parameter logging, and repetition testing—drives repeatable results. Maintaining an action log of fabric types, printer profiles, and observed outcomes makes it easier to replicate success and reduce trial-and-error iterations.
Best Practices for a Scalable DTF Printing Workflow
To achieve scalability, standardize recipes by fabric type and keep a library of curing times, heat press temperatures, and dwell times. This reduces decision fatigue, minimizes variation, and supports consistent results across operators.
Ongoing maintenance, high-quality materials, and pre-production checks are pillars of a robust DTF printing workflow. Cross-training teams—from designers to operators—ensures the process remains smooth when personnel change, helping to sustain efficiency and quality at scale.
Frequently Asked Questions
What is the core sequence of the DTF printing workflow, and how do the four stages (prep, print, cure, and press) contribute to consistent results?
The DTF printing workflow is a structured, repeatable process from design prep to final transfer on fabric. The four stages—prep (artwork verification, film readiness, and nozzle checks), print (printer setup and color management), cure (controlled temperature and humidity), and press (heat, pressure, and dwell)—work together to reduce errors, minimize waste, and deliver predictable transfers.
How can I optimize the DTF curing process to improve powder adhesion and transfer quality?
In the DTF curing process, control temperature and dwell time within a standard window to ensure ink activation without color shifts. Manage humidity to maintain consistent drying, allow the film to cool briefly after curing, and perform a powder adhesion check to confirm uniform adhesion. Document cure parameters for each film and ink combo to support repeatability.
What are essential DTF heat press settings to achieve durable transfers across different fabrics?
DTF heat press settings should start from typical ranges such as 160–170°C (320–340°F) for 12–20 seconds, then adjust for fabric type and film. Ensure even pressure and proper platen alignment, include a short pre-press to remove moisture, and allow a brief cooling period after pressing. Maintain a tested recipe library so operators can reproduce results reliably.
Which issues are commonly addressed by DTF troubleshooting tips, and how can you diagnose misregistration?
DTF troubleshooting tips are focused on misregistration, powder adhesion, color bleed or banding, and edge ghosting. Diagnose by checking registration marks and platen flatness, performing nozzle checks, verifying cure and film cleanliness, and recalibrating printer settings as needed.
Which DTF printing techniques contribute to repeatable results in a DTF workflow?
DTF printing techniques that promote repeatable results include robust color management with ICC profiles, monitoring color density, conducting test prints on scrap, and performing real-time print checks for defects. These practices help maintain consistency across jobs and reduce rework.
How can I standardize the DTF printing workflow across jobs using DTF prep steps and related stages?
Standardize the DTF printing workflow across jobs by building recipes for each fabric type (curing time, heat press temperature, and dwell time) and maintaining a centralized library and logs. Ground this practice in the DTF prep steps: perform a pre-production review of artwork and color profiles before production, then apply consistent curing and pressing parameters. Train teams across functions to sustain repeatability from prep through press.
| Phase | Key Points | Practical Tips |
|---|---|---|
| DTF Prep (Laying the Foundation) | Foundational phase that sets up design, materials, and machine settings; reduces errors; influences subsequent stages. |
|
| Printing Phase: Translating Design to Film | Translates digital design into ink on PET transfer film; aims for sharp detail, accurate color, and predictable ink deposition. |
|
| Curing Process: Setting Ink, Film, and Adhesion | Activates ink and prepares film for powder adhesion and transfer; influenced by film type, ink chemistry, and ambient conditions. |
|
| Pressing and Finishing: Transfer to Fabric | Bond film to fabric; precise heat, pressure, and time determine transfer quality and wash-fastness. |
|
| Quality Control and Troubleshooting | Identify root causes and implement corrective actions to minimize waste and rework. |
|
| Best Practices: Streamlining the DTF Workflow | Adopt practices that promote repeatability, quality, and throughput. |
|
| Common Mistakes to Avoid | Common missteps that undermine quality and efficiency. |
|
Summary
DTF printing workflow is a structured, repeatable process guiding everything from design prep to final transfer on fabric. By mastering the four core stages—prep, print, cure, and press—you can achieve consistent results, minimize waste, and scale production for both shops and hobbyists. This descriptive overview highlights practical tips, checklists, and troubleshooting guidance to optimize your DTF printing workflow for better transfer quality and repeatable success across jobs.