UV DTF transfer is redefining how creators decorate apparel, accessories, and home goods by combining vivid color with durable adhesion through UV-curable inks applied to a transfer film. This approach delivers precision and versatility, enabling sharp detail across a wide range of substrates while delivering a comfortable hand on fabrics and robust performance on hard surfaces. If you’re looking for UV DTF transfer ideas, you’re in the right place, because this guide gathers practical tips, tested workflows, and creative projects to spark your next production run. From color management and substrate selection to finishing touches and post-press care, you’ll find a structured approach that helps you move from concept to wearable art with confidence. Whether you’re experimenting at home or growing a small business, these insights aim to streamline your process and deliver vibrant results across multiple materials.
In other terms, this process uses ultraviolet-curable inks applied to a transfer film and then bonded to textiles, plastics, wood, or glass with heat and pressure. Think of it as a modern UV-printed transfer workflow for fabrics, offering high fidelity graphics and durable wear. LSI-friendly descriptors such as UV ink transfer on fabrics or UV curing-based imaging emphasize substrate compatibility, finishing quality, and repeatable results.
Understanding the UV DTF transfer process and substrate compatibility
UV DTF transfer uses ultraviolet cured inks on a transfer film that, when pressed with heat, creates a crisp, vibrant image with durable adhesion. Understanding the UV DTF transfer process helps you plan color accuracy and longevity from the start, ensuring your designs look as intended across projects.
Substrates vary in porosity and heat tolerance, so choosing the right target surface is essential. Cotton, polyester blends, wood, glass, and some plastics can be viable options, but always consult manufacturer guidelines and run quick tests before a larger run. A thoughtful substrate choice sets the foundation for successful DTF transfer projects.
DIY UV DTF transfers: a practical guide for beginners
DIY UV DTF transfers invite makers to explore at-home crafting with accessible tools and workflows. Start by gathering the essentials—transfer films compatible with UV inks, a heat source such as a heat press, and proper design software—to turn ideas into finished pieces.
Begin with simple designs and test on swatches to verify color reproduction and adhesion. Document your heat, time, and pressure settings for each substrate to build a repeatable workflow, then expand into more complex DIY UV DTF transfers as you gain confidence and precision.
UV DTF transfer ideas for apparel and home decor
This section explores UV DTF transfer ideas that span fabrics, decor, and everyday objects, highlighting how UV printing on fabric can yield vibrant, lasting results. From bold graphic tees to personalized totes and decorative pillows, the technology supports intricate line work and bright colors.
For each idea, plan color layering and edge handling to maintain sharpness on different substrates like fabric, canvas, and ceramic. Consider design scale, alignment, and practical care instructions to keep finished pieces looking fresh through washing and use.
UV printing on fabric: color management and design tips for vibrant results
Color management is key when working with UV printing on fabric. Calibrate your monitor and printer so screen previews align with the printed outcome, and anticipate slight color shifts on certain fabrics or textures. This attention to color fidelity helps you achieve consistent, bright results across projects.
Plan for bleed, safe margins, and multi-layer designs where each layer cures fully before the next. Testing with different fabric types remains important, as texture and fiber content can impact color accuracy and adhesion, making iterative swatches an essential part of the workflow.
DTF transfer projects: optimizing heat, pressure, and finishing touches
A successful DTF transfer project hinges on optimized heat, time, and pressure. Tailor your heat profile to each substrate, and use curved pressing techniques or molds for mugs, shoes, or other irregular surfaces to ensure even contact and sharp detail.
Finishing touches, such as sealing with a compatible clear coat, proper cooling, and careful post-press handling, extend durability. These steps reinforce color and edge integrity, helping your UV DTF transfer projects withstand washing and daily wear.
Troubleshooting, testing, and best practices for durable UV DTF transfers
When an image appears dull, misaligned, or ghosted, reassess alignment, heat time, and pressure. Re-temper the heat and extend the press slightly if outlines ghost or blur, especially on porous fabrics where contact can be inconsistent.
Adopt a testing mindset with regular test swatches before committing to full runs. Document settings, factories, and substrate variations to support batch processing and repeatable results. Ongoing care—clean substrates, maintain the heat press, and store films properly—ensures durable, vibrant UV DTF transfers over time.
Frequently Asked Questions
How does the UV DTF transfer process work, and what UV DTF transfer ideas should I consider for starting projects?
The UV DTF transfer process uses ultraviolet-cured inks on a transfer film that you apply to a substrate with heat and pressure, producing crisp, vibrant images with strong adhesion. For UV DTF transfer ideas, start with simple designs and test on your chosen fabrics or surfaces to dial in temperature, time, and pressure for best results.
What substrates work best for DIY UV DTF transfers and UV printing on fabric?
Look for substrates with suitable porosity and heat tolerance, such as cotton, polyester blends, wood, glass, and some plastics. Always check manufacturer guidelines and run a test swatch before a full run. For DIY UV DTF transfers on fabric, pre-wash fabrics to remove starch and sizing to improve adhesion.
How can I manage color in UV DTF transfer projects to ensure vibrant results?
Prioritize color management by calibrating your monitor and printer so on-screen color matches the print. Plan bleed and color layering, especially with bright neon colors, and be aware that different fabrics can shift color slightly after pressing. Use test swatches and document settings for consistency across DTF transfer projects.
What finishing steps are recommended after UV printing on fabric using UV DTF transfers?
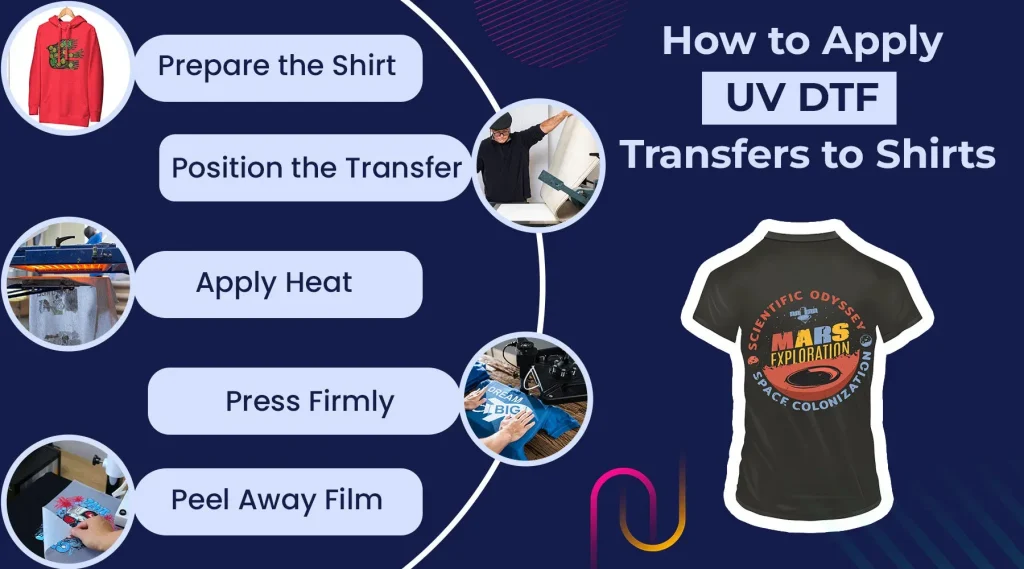
Prepare the substrate and apply heat at the recommended temperature and pressure. After pressing, let the item cool gradually and peel the carrier sheet slowly. Pre-wash and align carefully to minimize distortion, and seal where appropriate for added durability on certain surfaces.
What are common issues with the UV DTF transfer process and how can I troubleshoot them for DIY UV DTF transfers?
Common issues include dull images, ghosting, or color shifts. Check alignment, heat time, and pressure first. If ghosting occurs, retest with a slightly longer press and re-tint the color balance. Use test swatches on porous fabrics to optimize contact and curing before a larger run.
Can UV DTF transfers be used on curved or irregular surfaces like mugs, phones, or shoes, and what should I know about the application?
Yes, UV DTF transfers can be applied to curved surfaces with careful technique. Use curved pressing methods or molds to ensure even contact, allow for edge margins, and test on scrap pieces before final application. For best results, choose a compatible top coat or sealing method if recommended by your substrate and transfer film supplier.
| Topic | Key Points |
|---|---|
| Introduction and Overview |
|
| Understanding the Basics |
|
| Substrates & Compatibility |
|
| Creative Project Ideas |
|
| Design Considerations |
|
| Application Tips & Best Practices |
|
| Troubleshooting & Common Issues |
|
| Additional Tips to Enhance Results |
|
| Conclusion |
|


